After you installed a nice NVIDIA GPU for your computer, you also need Cuda to run your fancy tasks. Suppose you are using Python, you may also need Numba. It’s like, after fitting a new powerful engine to your car, you still need to install steering wheel and gas pedal before you can drive.
System: Ubuntu 18.04
GPU: Nvidia GeForce RTX 2080 Ti
Step 1. Download Cuda and run installation.
You can find the most updated version of Cuda here, and follow the instruction to download and run. https://developer.nvidia.com/cuda-downloads
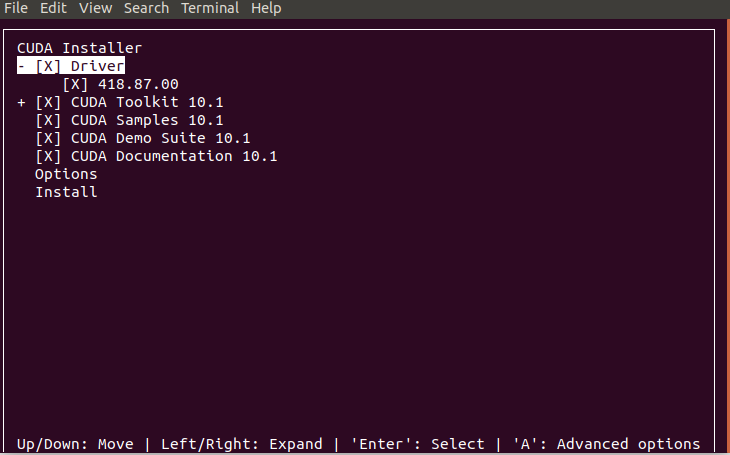
When seeing this window, if you already have a driver installed for your GPU, unselect Driver because there will be a conflict. If not, keep default selections.

Step 2. Reboot
Run this in your command window:
1
$ reboot
After rebooting, you possibly find that your display is totally changed, e.g. aspect ratio, resolution, this could be the problem of the driver as faced by many developers. What you need to do is just replace the driver.
Entering TTY mode:
PressCtrl + Alt + F1- Run the following to uninstall your current driver and install a new one:
1
2
3
4
$ sudo apt-get purge nvidia-*
$ sudo add-apt-repository ppa:graphics-drivers/ppa
$ sudo apt-get update
$ sudo apt-get install nvidia-driver-430
For the last command, check your Download folder to see what actually being download. It should be some files with name “NVIDIA-Linux-x86_64-430.50.run”, then change the postfix, e.g. -430, accordingly. Another way is you may just replace it with:
1
$ sudo apt-get install <package>
As suggested here.
- Reboot again.
The displaying problem should be solved.
For more reference, see:
- https://github.com/dusty-nv/jetson-inference/issues/85\
- https://askubuntu.com/questions/760934/graphics-issues-after-while-installing-ubuntu-16-04-16-10-with-nvidia-graphics
Step 3. Setting up enrironmental variables
As instructed by installation guide, you need to set up environment variables. Just run the following, remember to check the installation guide for the right postfix, i.e. “-10.2” here. It changes over time.
1
$ export PATH=/usr/local/cuda-10.2/bin:/usr/local/cuda-10.2/NsightCompute-2019.1${PATH:+:${PATH}}
If you are using a 64-bit system, also run this:
1
$ export LD_LIBRARY_PATH=/usr/local/cuda-10.2/lib64\${LD_LIBRARY_PATH:+:${LD_LIBRARY_PATH}}
Now Cuda is all set!
Step 4. Install Numba
Numba is used to support Cuda GPU programming at Python end. Just run this if you have ‘pip’ installed on your computer:
1
$ pip install numba
Step 5. Configure Numba
1
2
$ export NUMBA_CUDA_SDK_NVVM=/usr/local/cuda-9.0/nvvm/lib64/libnvvm.so
$ export NUMBA_CUDA_SDK_LIBDEVICE=/usr/local/cuda-9.0/nvvm/libdevice/
Note: without the above operation, you may see an error: NvvmSupportError: libNVVM cannot be found. Do conda install cudatoolkit: library nvvm not found This error could also be found if you haven’t installed Cuda.
Some tutorials suggest do the following:
1
2
$ export NUMBAPRO_NVVM=/usr/local/cuda-9.0/nvvm/lib64/libnvvm.so
$ export NUMBAPRO_LIBDEVICE=/usr/local/cuda-9.0/nvvm/libdevice/
However, this could lead to warning: Environment variables with the ‘NUMBAPRO’ prefix are deprecated, found use of NUMBAPRO_NVVM=/usr/local/cuda/nvvm/lib64/libnvvm.so.
So, remember to add “CUDA_SDK” in between. This is suggested by: https://github.com/numba/numba/issues/2879
Step 6. Test Run
Alright, we have everything installed, now it’s time to check-up. Open a Python script and run the following. This will be run by CPU.
import numpy as np from timeit import default_timer as timer def pow(a, b, c): for i in range(a.size): c[i] = a[i] ** b[i] def main(): vec_size = 10 ** 8 a = b = np.array(np.random.sample(vec_size), dtype=np.float32) c = np.zeros(vec_size, dtype=np.float32) start = timer() pow(a, b, c) duration = timer() - start print("Using CPU costs: ", duration, " seconds.") if __name__ == '__main__': main()With my computer, the output is:
1
Using CPU costs:  39.464737400994636  seconds.
Then, GPU?
import numpy as np from timeit import default_timer as timer from numba import vectorize @vectorize(['float32(float32, float32)'], target='cuda') def pow(a, b): return a ** b def main(): vec_size = 10 ** 8 a = b = np.array(np.random.sample(vec_size), dtype=np.float32) c = np.zeros(vec_size, dtype=np.float32) start = timer() c = pow(a, b) duration = timer() - start print("Using GPU costs: ", duration, " seconds.") if __name__ == '__main__': main()My output is:
1
Using GPU costs:  0.33047461399110034  seconds.
It’s almost 10 times faster. Enjoy!